Dealing with rugs and pets can be a real challenge, especially when your cat has zero respect for floor coverings, which is exactly what happened in our home. I thought we were finally safe when we put down a big, rubbery entry mat with gaps and swirls designed to repel moisture and dirt. Surely, that wouldn’t invite any accidents, right? Wrong. Our cranky old cat, Lucky, somehow managed to balance just enough to use the mat as his personal bathroom, and every time he did, he caused more damage to the laminate flooring underneath.

I couldn’t take it anymore—I was genuinely worried about the condition of our subfloor. Since this is our main entryway, we needed something durable, waterproof, and easy to clean that could withstand wet, muddy shoes and, unfortunately, a little cat mischief. We do plan to install beautiful hardwood floors throughout the main level eventually, but that’s a pricey project we’re not ready for just yet. Plus, I wanted a tougher solution for this particular spot that could hold up better against daily wear and tear.
My husband and I both agreed that most tiled entryways look outdated or just aren’t our style. But then I remembered what we did in our kitchen: we used hexagon porcelain tiles, cutting into the laminate floor and fitting the tiles like puzzle pieces to create a seamless transition between two flooring types. It was both functional and visually appealing. So, I decided to take the same approach for our entryway—cut out the damaged laminate and replace it with those same hexagon tiles. This would also keep the flooring consistent across the main floor without too many different materials clashing. The porcelain tiles are durable, easy to clean, and textured enough to prevent slipping, making them perfect for an entry that gets lots of traffic and mess. The tiled area didn’t need to be huge, just enough to function as a sort of “rug” and cover the ruined floor.
This plan sounded manageable, especially after completing a massive bathroom remodel, and I already had most of the supplies on hand except for the tile itself. So, the project was pretty affordable—the tile cost me a little over $100, and if you had to buy everything from scratch, it might run you around $250. Here’s what I used: hexagon floor tiles from Mission Stone & Tile, waterproofing membranes like AquaDefense and Schluter Kerdi, rapid-setting thin-set mortar, grout, and caulk.
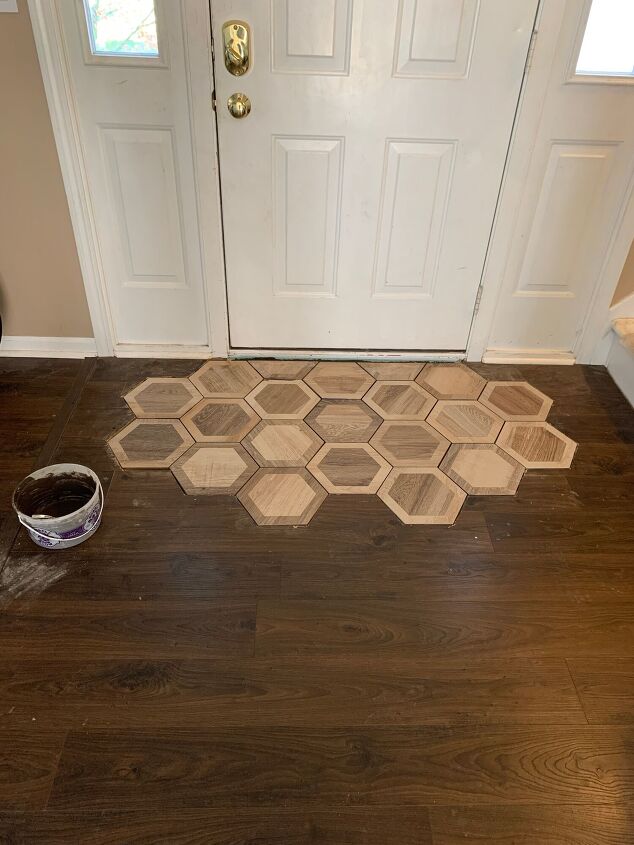
Once the tile arrived, my 4-year-old and I had fun planning the layout, experimenting with different shapes before settling on placing the tiles right over the damaged floor after cleaning it as best as I could. I spaced the tiles exactly as I wanted the grout lines, leaving out one tile to cut for the edges near the door. After positioning the tiles, I traced their outline onto the floor with a Sharpie, making sure to leave a bit of extra space for adjustments and to allow for caulking between the new tiles and the existing floor.
Next came the messy part: cutting out the old laminate. Using my oscillating saw, I carefully followed the traced lines, making clean cuts even around all the hexagon corners. If you have a circular saw, it’s faster for straight cuts, but mine was out of commission at the time, so I relied on the oscillating tool for the corners and tight spaces. After cutting, I pried up the damaged boards, swept up the debris, and tossed everything into a garbage bag. Goodbye, ruined floor!
Waterproofing was next. In the kitchen, I’d gone all out with Schluter Ditra membrane for total protection, but that felt like overkill here. Instead, I used some scrap Schluter Kerdi membrane combined with a few coats of AquaDefense liquid membrane leftover from the bathroom project. After sweeping the area clean, I spread the Kerdi over the subfloor and painted on the AquaDefense with a disposable brush. It went on thick and sticky, almost like glue, helping hold the membrane in place. I waited about an hour between coats and did two coats to make sure the surface was even and waterproof, especially paying close attention to the area under the door, which had suffered moisture damage before.
Once the waterproofing was dry, I mixed the rapid-setting thin-set mortar in an old ice cream bucket with a paint stir stick—because professional tools are overrated, right? Mixing mortar can be tricky, but I found it easier to add some water first, then pour in the mortar, adding more water as needed for a smooth consistency. For such a small area, I poured the mortar in a puddle and spread it evenly with the stir stick until the layer was thick enough to cover the blue waterproof membrane underneath but not too thick.
Then came the fun part: laying the tiles. I started with the top right tile against the door and wall in the cut-out section, pressing it firmly into the mortar and leaving a bit of space for grout lines. I carefully placed the rest of the whole tiles, spacing them evenly. When mortar squeezed up between the tiles, I wiped it away to prevent it from showing through the grout. For the last tile, I took it to my garage and cut it in half with a rented tile saw, fitting the pieces neatly where needed. I watched over the tiles for a few hours to keep pets and kids from stepping on them—another reason I love rapid-setting mortar! Once I could press on a tile without it moving, I called it good and let everything set overnight.
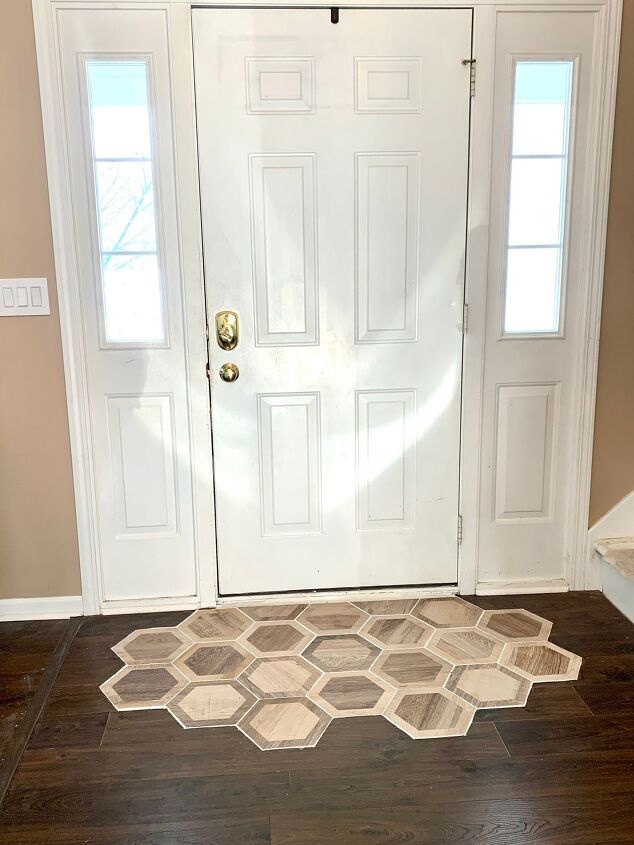
The next day, I tackled grouting, using the same grout as in the kitchen. Grouting isn’t glamorous and requires patience, which I sometimes lack. I mixed the grout, applied it over the spaces between tiles, and wiped it back and forth until all gaps were filled. It’s important to check from different angles to avoid any air pockets that can cause problems later. I mostly ignored the edges where the tile met the old flooring because those gaps should be caulked, not grouted, for flexibility with floor movement. However, a few larger gaps I filled with grout for added protection, especially under the door.
Grouting makes a mess, but after letting it sit and following manufacturer instructions, I wiped off the excess with a wet sponge, which felt a little like playing Cinderella. A helpful tip I’ve learned: baby wipes are amazing for scrubbing off the stubborn grout haze that remains after repeated washing. They work better than anything else I’ve tried.
Finally, I caulked the edges between the tiles and the existing floor to hide any uneven cuts or gaps. I used white caulk that matched the grout color to blend everything nicely. With a caulk gun, I applied a smooth line of caulk and used another baby wipe to smooth it out, cleaning up any stray spots along the way.
And that was it! Instead of a ruined floor hidden under a mat, we now have a cool, durable tiled entry that can stand on its own. We’ve already taken off countless snow-covered shoes here, and it’s perfect for not worrying about dirty or wet rugs—especially from shoes, but let’s keep the focus on the shoes!